


When you play a lot of foosball, you’ll notice two things about the balls. First, they wear out, becoming slick and difficult to control. Second, buying new ones is expensive, around $4 each.
Luckily, it’s not hard to build a foosball tumbler that can refresh the balls. You attach the tumbler to the inside of a clothes dryer, let it run for about 3 hours, and the balls will be clean and fuzzy again.
Keep Your Table Clean
First things first: if your table is dirty, your balls won’t last long. Keep your table clean. I use a mixture of 50% Formula 409 and 50% water. Other people use rubbing alcohol. Whatever you use should be a mixture of a solvent to cut grease, plus water to dissolve any spilled soda. Don’t use anything too harsh or abrasive. Protect the finish on the playing surface.
Spray the cleaning fluid on a soft cloth, and gently wipe down the table surface. Use a bit more force to remove any grease stains or shot marks, but be careful not to remove the finish.
Clean the side walls the same way, particularly underneath the rods. Lubricant from the rods will attract dirt. Cleaning the ball ramps inside the table can also be helpful.
Tables get extra dirty if players use too much lube. Use only one or two drops of silicone on each bearing. It doesn’t take much to keep the table playing smoothly. Wipe up any silicone that spills on the table, but leave the lubricant on the rods.
If the rods need more than a drop or two of silicone, you might need to clean the bearings. Remove the bearings, and wipe them out with the same cleaning formula. If the insides are scratched up, it’s time to replace the bearings. They aren’t expensive, and they make a big difference in playability. If you clean the bearings, clean the rods at the same time. Then reattach the bearings, and lube up the table again.
Building a Tumbler
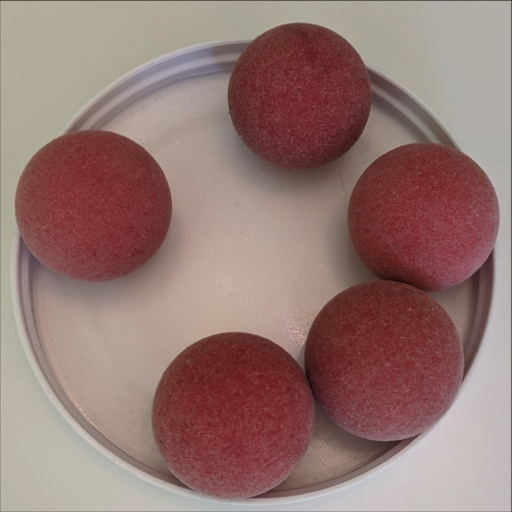
The tumbler is a plastic container lined with sandpaper, attached to the inside of a clothes dryer. Drop around 20 balls inside the tumbler, then run the dryer on a no-heat cycle for 2-3 hours. The sandpaper removes the dirt from the balls and roughs up the surface a bit.
Here’s the tumbler in action:
Tumbler Materials
Round plastic containers, light-weight, around 1 gallon size. (Three works well.)
Wide velcro strips with adhesive, about 18″ x 4″ for each tumbler.
A few large sheets of coarse sandpaper, 36 grit or 40 grit.
A pillow.
Rubbing alcohol.
A clothes dryer that you can modify.
Assembly
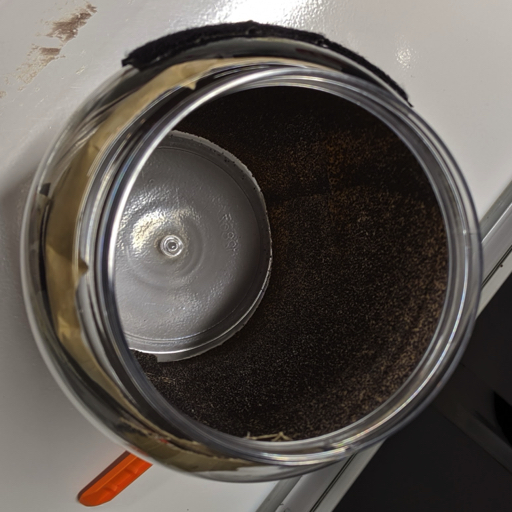
Attach the sandpaper to the inside of the tumbler
Cut the sandpaper so that it fits into the inside of the container. You’ll probably need a couple of sheets per container. It’s OK if they overlap, the fit doesn’t need to be precise.
Wipe out the inside of the plastic containers with rubbing alcohol to remove any oil or dust. Spray the adhesive on the inside of the container, and let it get a bit tacky.
Press the sandpaper into the sides of the container. You can keep working on the rest of the project while the adhesive dries.
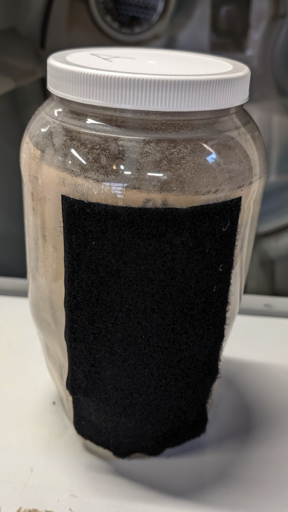
Attach the velcro to the outside of the jars
Take a close look at your hook and loop (aka velcro) strips. One side is soft, the loops. Another is scratchy, the hooks. The scratchy hooks will damage clothing, so we’ll use the soft loops for the tumbler and the dryer.
Clean the exterior of the tumbler with rubbing alcohol. Cut a strip of the soft loops, and attach it to the outside of the tumbler.
Give the adhesives some time to set. Practice your foosball game.
Attach the velcro to the dryer fins
Clean the fins with rubbing alcohol. Attach two large strips of the soft loops to the dryer fins.
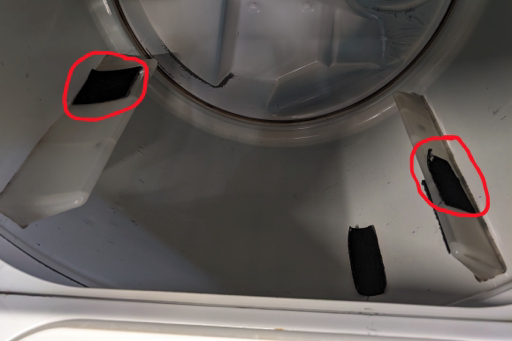
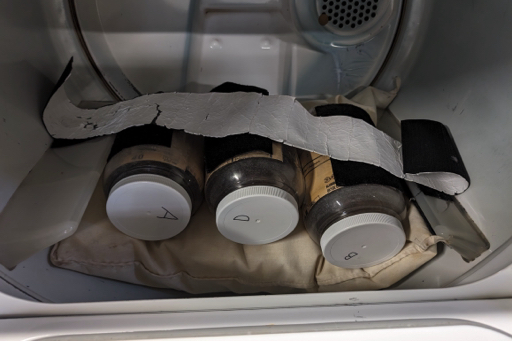
Attach the tumbler to the dryer
Put the pillow in the dryer, then place the jars on top of the pillow. Measure out a long strip of the hook-side of the velcro. The strip should long enough to attach to both of the soft loop pieces inside the dryer and hold the tumbler firmly in place. You may need to place the strip diagonally to maximize the contact area between the hooks and loops, or use multiple strips.
Cleaning the balls
If the balls are particularly greasy, it’s a good idea to clean them before placing them in the tumbler. Putting them in a mesh laundry bag inside a clothes washing machine works well.
Running the tumbler
Place about 10 balls inside each jar, depending on how large a tumbler you’ve built. Put the lid on the tumbler, then attach the tumbler to the inside of the dryer.
Set the dryer on no-heat, and let it run for 2-3 hours. The balls will come out cleaner, with a rougher surface that gives better control.
The first time you run the tumbler, stay near the dryer to check for problems. If you hear the tumbler detach from the dryer, stop the machine, add some additional velcro strips, and try again. Also check on the sides of the dryer, to make sure the jars aren’t damaging the interior.
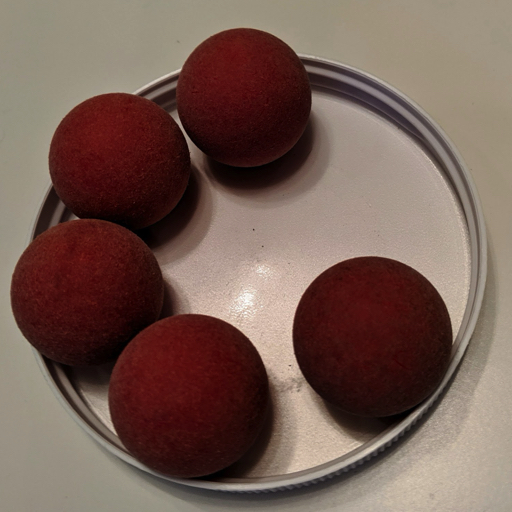
When to replace the balls
A tumbler is great, and can give months more life to balls. Eventually balls do become too slick to be refreshed. Check the balls after tumbling. If they still look dirty, or feel slick, they are completely worn out. Time to buy some new ones.
